Apparatus:
either rubber launcher with 15 projectiles or rocket
launcher
Measuring tapes
For rubber launchers, you need four-person groups
Procedure:
IMPORTANT PRELIMINARIES
We will be shooting our projectiles with rubber launchers or air rocket
launchers. If using the rubber launchers, when the rubber tube
is pulled back, it is under tension, and will spring back when you let go. How far
you pull it back is what determines the initial speed of the projectile. If
using the rocket launchers, do not worry about where the lab talks about
"pulling back the same amount", etc. The air rocket launchers are relatively
reproducible if you use the same size launching cap each time.
When you shoot your projectile, you are going to want to make it as reproducible as
possible. You will have to carefully measure the angle every time, and be sure to
pull back the rubber launcher exactly the same amount every time. Again, if
you are using the air rockets, you do not need to worry about references to
pulling back the launcher.
Use common sense. Do not shoot toward any people, be sure everyone is out of the
way and ready when you are getting set to fire. These launchers are dangerous if not
used properly.
A. Determination of the Initial Speed of the Projectile
- Get a little practice shooting the projectiles. Then, when you think you are ready
to start taking measurements, prepare to measure the initial speed of the projectile.
Remember, for the balloon launchers, how far you pull it back determines the initial speed, so
determine a set
distance to pull back the launcher, and always use that distance from now on.
It is going to take some work to figure out how to stretch it the same
amount every time, and also vary the angle.
- Figure out how you are going to determine the initial speed of the
projectile. Use the kinematic relationships to help decide, and use a
stopwatch and/or a measuring tape in order to determine it.
- Shoot enough projectiles (at the same speed) so that you can determine an
average speed to 90% confidence (at least 5 trials). No actual error analysis is necessary until
the analysis portion of the experiment.
B. Determination of the Range of the Projectile
Now we also want to fix the angle at which we are
shooting. Use an angle between 10 and 75 degrees up from the ground. We
want to be able to determine the range of the projectile from only the
initial speed and angle.
Using this angle, the initial (averaged) speed, and the height above the
ground from which the projectile leaves the launcher, you will measure and
predict
the horizontal distance that the projectile will travel before hitting the
ground. To predict this, we need to use the range equation from the
theory section:
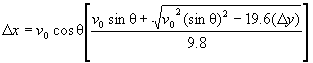 .
.
- To measure it, be sure to keep the same angle, same initial height and same stretch in the
projectile launcher for each shot. If, when you make multiple shots,
they do not land relatively near to each other, something might be wrong. Once you are
convinced you are doing okay, make at least five shots and record
each distance. In the analysis of the data for this
lab, you will use the null hypothesis to compare this measured distance (to
90% confidence) to the expected distance from the theoretical equation. We certainly expect there to be some error.
Department
of Physics